In this guide we will show you how to properly setup and configure a VM running pi-hole for use as an ad filter on your home connection.
While traditionally Pi-Hole is ran on a device hosted in your LAN it can also be ran remotely if proper precautions are taken.
One of the benefits of setting it up this way is that it can be ran from a very small server (1CPU – 512MB ram) or ran on an existing web server with little impact to performance. An additional benefit is that you can allow multiple locations or users to use your Pi-Hole server as well so that they won’t need to setup their own.
One concern is Security and the risk of DDOS and DNS amplification attacks. To prevent this we will only be allowing connections from IPs that we specify.
At the end of this guide you will have a secured Pi-Hole server running DoT (DNS over TLS) and DOH (DNS over HTTPS).
To do this we will be using CentOS 8, PiHole 5, lighttpd, stunnel, cloudflared, and firewalld.
Before we get started we will assume that you have already performed the following steps:
1). Already have a domain or subdomain pointing to your Pi-Hole Server
2). Apache/Nginx already installed and listening on ports 80/443 with a certbot (Let’s encrypt) SSL already setup. (When setting up the cert, use the following flag –preferred-chain “ISRG Root X1”)
3). You have Dynamic DNS configured on your Home router.
Once these steps have been completed you can proceed below:
1). curl -sSL https://install.pi-hole.net | bash
2). yum install php-json
3). vi /etc/lighttpd/lighttpd.conf
# Pi-hole: A black hole for Internet advertisements
# (c) 2017 Pi-hole, LLC (https://pi-hole.net)
# Network-wide ad blocking via your own hardware.
#
# lighttpd config for Pi-hole
#
# This file is copyright under the latest version of the EUPL.
# Please see LICENSE file for your rights under this license.

###############################################################################
#     FILE AUTOMATICALLY OVERWRITTEN BY PI-HOLE INSTALL/UPDATE PROCEDURE.     #
# ANY CHANGES MADE TO THIS FILE AFTER INSTALL WILL BE LOST ON THE NEXT UPDATE #
#                                                                             #
#              CHANGES SHOULD BE MADE IN A SEPARATE CONFIG FILE:              #
#                         /etc/lighttpd/external.conf                         #
###############################################################################

server.modules = (
        "mod_access",
        "mod_auth",
        "mod_fastcgi",
        "mod_accesslog",
        "mod_expire",
        "mod_compress",
        "mod_redirect",
        "mod_setenv",
        "mod_rewrite"
)

server.document-root        = "/var/www/html/admin"
server.error-handler-404    = "/pihole/index.php"
server.upload-dirs          = ( "/var/cache/lighttpd/uploads" )
server.errorlog             = "/var/log/lighttpd/error.log"
server.pid-file             = "/var/run/lighttpd.pid"
server.username             = "lighttpd"
server.groupname            = "lighttpd"
server.port                 = 8080
accesslog.filename          = "/var/log/lighttpd/access.log"
accesslog.format            = "%{%s}t|%V|%r|%s|%b"


index-file.names            = ( "index.php", "index.html", "index.lighttpd.html" )
url.access-deny             = ( "~", ".inc", ".md", ".yml", ".ini" )
static-file.exclude-extensions = ( ".php", ".pl", ".fcgi" )

compress.cache-dir          = "/var/cache/lighttpd/compress/"
compress.filetype           = ( "application/javascript", "text/css", "text/html", "text/plain" )

mimetype.assign   = ( ".png"  => "image/png",
                      ".jpg"  => "image/jpeg",
                      ".jpeg" => "image/jpeg",
                      ".html" => "text/html",
                      ".css" => "text/css; charset=utf-8",
                      ".js" => "application/javascript",
                      ".json" => "application/json",
                      ".txt"  => "text/plain",
                      ".svg"  => "image/svg+xml" )

# default listening port for IPv6 falls back to the IPv4 port
#include_shell "/usr/share/lighttpd/use-ipv6.pl " + server.port
#include_shell "/usr/share/lighttpd/create-mime.assign.pl"
#include_shell "/usr/share/lighttpd/include-conf-enabled.pl"

fastcgi.server = ( ".php" =>
                   ( "localhost" =>
                     (
                       "socket" => "/tmp/php-fastcgi.socket",
                       "bin-path" => "/usr/bin/php-cgi"
                     )
                   )
                 )

# If the URL starts with /admin, it is the Web interface
$HTTP["url"] =~ "^/admin/" {
          # Create a response header for debugging using curl -I
    setenv.add-response-header = (
        "X-Pi-hole" => "The Pi-hole Web interface is working!",
        "X-Frame-Options" => "DENY"
    )

    $HTTP["url"] =~ ".ttf$" {
        # Allow Block Page access to local fonts
        setenv.add-response-header = ( "Access-Control-Allow-Origin" => "*" )
    }
}

# Block . files from being served, such as .git, .github, .gitignore
$HTTP["url"] =~ "^/admin/\.(.*)" {
     url.access-deny = ("")
}

# Add user chosen options held in external file
# This uses include_shell instead of an include wildcard for compatibility
include_shell "cat external.conf 2>/dev/null"
4). service lighttpd restart
5). pihole -a -p (Sets a password for the Pi-Hole interface)
6). dnf install firewalld
7). systemctl enable firewalld
8). systemctl start firewalld
9). firewall-cmd –zone=public –add-port=80/tcp –permanent
firewall-cmd –zone=public –add-port=443/tcp –permanent
firewall-cmd –zone=public –add-port=22/tcp –permanent
firewall-cmd –zone=public –add-port=8080/tcp –permanent
firewall-cmd –zone=public –add-port=444/tcp –permanent
10). firewall-cmd –permanent –add-rich-rule=’rule family=”ipv4″ source address=”My IP” port protocol=”tcp” port=”53″ accept’
firewall-cmd –permanent –add-rich-rule=’rule family=”ipv4″ source address=”My IP” port protocol=”tcp” port=”853″ accept’
firewall-cmd –permanent –add-rich-rule=’rule family=”ipv4″ source address=”My IP” port protocol=”udp” port=”53″ accept’
11). vi /etc/firewalld/zones/public.xml
<?xml version="1.0" encoding="utf-8"?>
<zone>
  <short>Public</short>
  <description>For use in public areas. You do not trust the other computers on networks to not harm your computer. Only selected incoming connections are accepted.</description>
  <service name="ssh"/>
  <service name="dhcpv6-client"/>
  <service name="cockpit"/>
  <service name="http"/>
  <port port="80" protocol="tcp"/>
  <port port="8080" protocol="tcp"/>
  <port port="22" protocol="tcp"/>
  <port port="443" protocol="tcp"/>
  <port port="444" protocol="tcp"/>
  <rule family="ipv4">
<source address="67.x.x.x"/>"
    <port port="53" protocol="tcp"/>
    <accept/>
  </rule>
  <rule family="ipv4">
<source address="67.x.x.x"/>"
    <port port="853" protocol="tcp"/>
    <accept/>
  </rule>
  <rule family="ipv4">
<source address="67.x.x.x"/>"
    <port port="53" protocol="udp"/>
    <accept/>
  </rule>
</zone>
You will now want to make a note of the lines that begin with “<source address=”. In this example they are lines 15, 20, and 25.
12). mkdir /scripts
13). vi /scripts/dns.sh
myhost=$(dig +short myhome.tplinkdns.com)

start='<source address="'
end='"/>"'
complete="${start}${myhost}${end}"

cp /etc/firewalld/zones/public.xml /etc/firewalld/zones/public2.xml
sed -i '15d' /etc/firewalld/zones/public2.xml
sed -i "15i $complete" /etc/firewalld/zones/public2.xml

sed -i '20d' /etc/firewalld/zones/public2.xml
sed -i "20i $complete" /etc/firewalld/zones/public2.xml

sed -i '25d' /etc/firewalld/zones/public2.xml
sed -i "25i $complete" /etc/firewalld/zones/public2.xml

rm /etc/firewalld/zones/public.xml
mv /etc/firewalld/zones/public2.xml /etc/firewalld/zones/public.xml

firewall-cmd --reload
Make sure to replace myhome.tplinkdns.com with the Dynamic DNS domain/subdomain you have setup on your home router. In this example I am using a router provided by TP-Link.
Also make sure to replace the 6 lines of sed with the line numbers for your source address. If for example my 1st line was 12 instead of 15 the command would be: sed -i ’12d’ /etc/firewalld/zones/public2.xml and sed -i “12i $complete” /etc/firewalld/zones/public2.xml
14). chmod +x /scripts/dns.sh
15). crontab -e
*/5 * * * * /scripts/dns.shThis runs our check script every 5 minutes. If your Home IP were to change this script will update your firewall so that you still have access to the DNS Server.
16). yum install stunnel
17). vi /etc/stunnel/dnstls.conf
[dnstls]
cert = /etc/letsencrypt/live/dns.mydomain.com/fullchain.pem
key = /etc/letsencrypt/live/dns.mydomain.com/privkey.pem

accept = 853
connect = 127.0.0.1:53
18). systemctl enable stunnel
19). stunnel /etc/stunnel/dnstls.conf
20). chmod +x /etc/rc.local
21). vi /etc/rc.local
#!/bin/bash
# THIS FILE IS ADDED FOR COMPATIBILITY PURPOSES
#
# It is highly advisable to create own systemd services or udev rules
# to run scripts during boot instead of using this file.
#
# In contrast to previous versions due to parallel execution during boot
# this script will NOT be run after all other services.
#
# Please note that you must run 'chmod +x /etc/rc.d/rc.local' to ensure
# that this script will be executed during boot.

touch /var/lock/subsys/local
stunnel /etc/stunnel/dnstls.conf
22). vi /etc/lighttpd/external.conf
$HTTP["host"] == "dns.mydomain.com" {
  # Ensure the Pi-hole Block Page knows that this is not a blocked domain
  setenv.add-environment = ("fqdn" => "true")

  # Enable the SSL engine with a LE cert, only for this specific host
  $SERVER["socket"] == ":444" {
    ssl.engine = "enable"
    ssl.pemfile = "/etc/letsencrypt/live/dns.mydomain.com/cert.pem"
    ssl.privkey = "/etc/letsencrypt/live/dns.mydomain.com/privkey.pem"
    ssl.ca-file =  "/etc/letsencrypt/live/dns.mydomain.com/fullchain.pem"
    ssl.honor-cipher-order = "enable"
    ssl.cipher-list = "EECDH+AESGCM:EDH+AESGCM:AES256+EECDH:AES256+EDH"
    ssl.use-sslv2 = "disable"
    ssl.use-sslv3 = "disable"
  }

  # Redirect HTTP to HTTPS
  $HTTP["scheme"] == "http" {
    $HTTP["host"] =~ ".*" {
      url.redirect = (".*" => "https://%0$0")
    }
  }
}
23). service lighttpd restart
24). Login to the Cloud Panel and edit your firewall rules to allow the following TCP ports: 22, 53, 80, 443, 444, 853, and 8080 as well as UDP port: 53
You have now setup and fully protected your PiHole Server.
You can then set your router or any device on your home connection to use the IP of your server as your DNS Server.
You can also use any device or OS that supports DoT to use your domain name for additional protection (Ex: dns.mydomain.com). On Android Phones this is called Private DNS but be aware that as you are only allowing it from the Home IP if you were to go to 4G you would lose the connection to the DNS Server. A workaround for this would be to use a App such as “Tasker” to automatically change your DNS Server when connecting to 4G to use a Publicly available option such as 1dot1dot1dot1.cloudflare-dns.com. More details about this can be read HERE.
DoT is not currently natively supported by Windows 10 but support may come in the future. In the meantime you can either use normal DNS or look for 3rd-party apps to add support for DoT to Windows.
Currently we would recommend Stubby on Windows 10:
https://dnsprivacy.org/wiki/display/DP/Windows+installer+for+Stubby
All you need to do with Stubby to use your pi-hole is to edit stubby.yml and remove all of the current Upstream servers and replace it with this:
  - address_data: 74.208.X.X
    tls_auth_name: "dns.mydomain.com"
We would also recommend editing stubby.yml with:
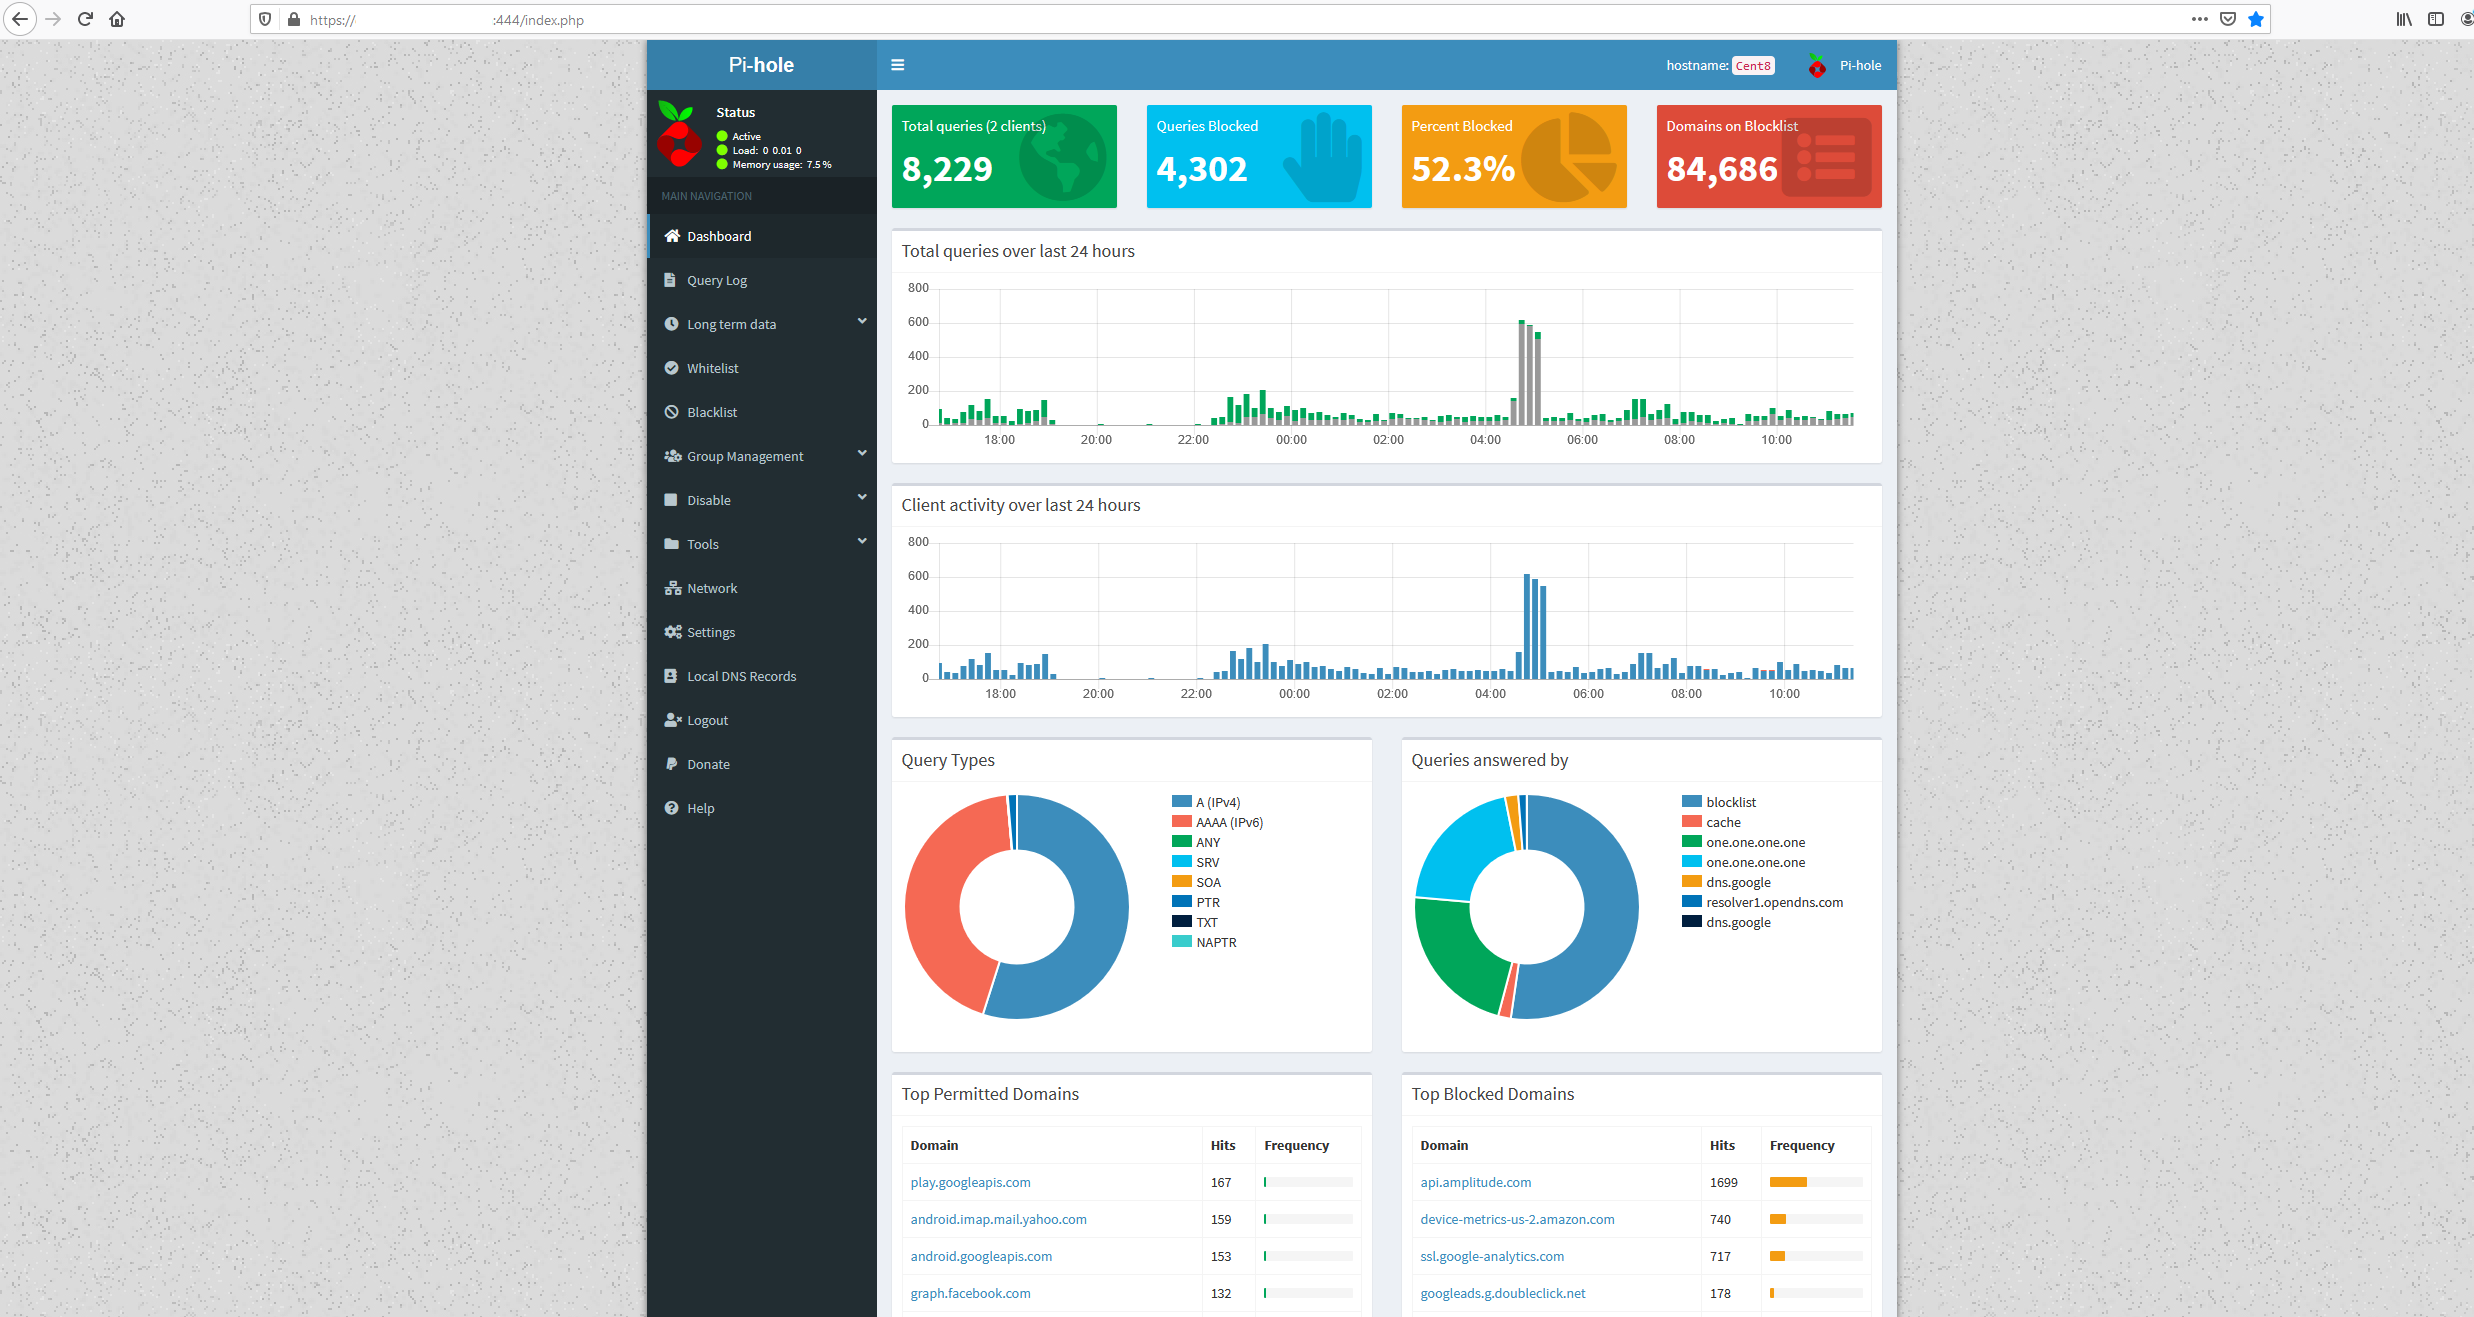
round_robin_upstreams: 0To manage and check on your PiHole Server you can now go to https://dns.mydomain.com:444
Optional: Enable DoH (DNS over HTTPS)
1). wget https://bin.equinox.io/c/VdrWdbjqyF/cloudflared-stable-linux-amd64.rpm
2). yum install ./cloudflared-stable-linux-amd64.rpm
3). mkdir /etc/cloudflared/
4). vi /etc/cloudflared/config.yml
proxy-dns: true
proxy-dns-port: 5053
proxy-dns-upstream:
  - https://1.1.1.1/dns-query
  - https://dns.google/dns-query
5). cloudflared service install
6). After performing these steps login to your pi-hole at: https://dns.mydomain.com:444
7). Go to Settings > DNS
8). Uncheck all currently selected Upstream DNS Servers
9). Hit the checkbox next to Custom 1 (IPv4) and use:
127.0.0.1#505310). Hit save
You can now enable it on any OS or program that supports it.
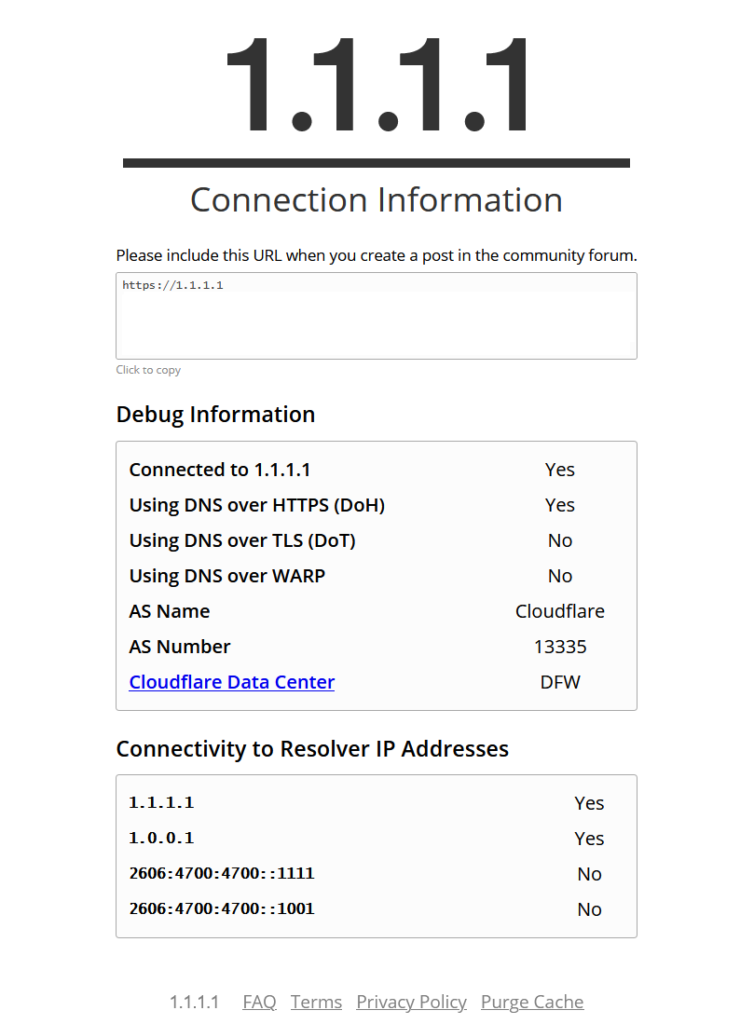
After enabling this you can go to the link below to check your status:
To note it will only show DoH active even if DoT is also used. This is because Cloudflare is sending Pi-Hole DoH traffic and is unaware of your DoT connection from your client to Pi-Hole. The 2nd line in our config.yml has us connect to Google using DoH instead. This will only be used if CloudFlare’s DNS were to go offline.
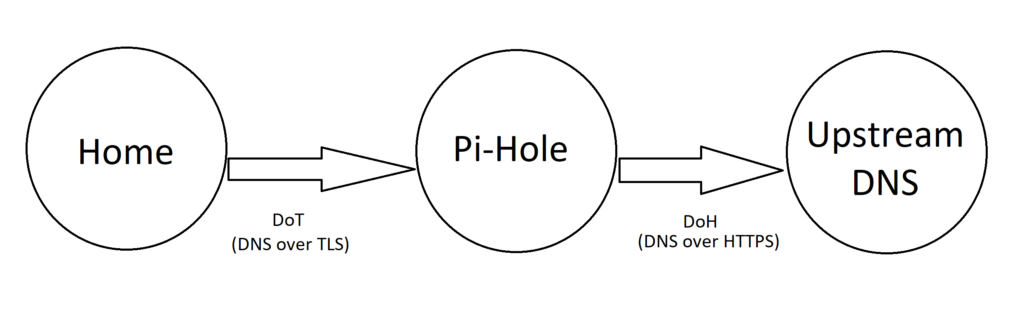
In the end if DoT and DoH are used together the connection will be fully secured from end-to-end. DoT will secure the connection from your Home to Pi-Hole, and DoH will secure the connection between your server and the Upstream DNS provider (Cloudflare or Google).
Optional: Configure rotating Upstream DNS Providers.
By default cloudflared will only use the secondary DoH DNS Server if the first is unavailable. If you would prefer to Rotate through your provider list continuously you can script this instead.
In the example below we will rotate between Cloudflare, Google, and OpenDNS:
1). Make a copy of your current config to create 3 in total:
cp /etc/cloudflared/config.yml  /etc/cloudflared/config-1.yml
cp /etc/cloudflared/config.yml  /etc/cloudflared/config-2.yml
cp /etc/cloudflared/config.yml  /etc/cloudflared/config-3.yml
2). vi /etc/cloudflared/config-1.yml
proxy-dns: true
proxy-dns-port: 5053
proxy-dns-upstream:
  - https://146.112.41.2/dns-query
  - https://dns.google/dns-query
  - https://1.1.1.1/dns-query
3). vi /etc/cloudflared/config-2.yml
proxy-dns: true
proxy-dns-port: 5053
proxy-dns-upstream:
  - https://1.1.1.1/dns-query
  - https://146.112.41.2/dns-query
  - https://dns.google/dns-query
4). vi /etc/cloudflared/config-3.yml
proxy-dns: true
proxy-dns-port: 5053
proxy-dns-upstream:
  - https://dns.google/dns-query
  - https://1.1.1.1/dns-query
  - https://146.112.41.2/dns-query
5). Next create 3 new scripts
vi /scripts/dns-change1.sh
rm /etc/cloudflared/config.yml
cp /etc/cloudflared/config-1.yml /etc/cloudflared/config.yml
cloudflared service install --legacy
systemctl restart cloudflared
6). vi /scripts/dns-change2.sh
rm /etc/cloudflared/config.yml
cp /etc/cloudflared/config-2.yml /etc/cloudflared/config.yml
cloudflared service install --legacy
systemctl restart cloudflared
7). vi /scripts/dns-change3.sh
rm /etc/cloudflared/config.yml
cp /etc/cloudflared/config-3.yml /etc/cloudflared/config.yml
cloudflared service install --legacy
systemctl restart cloudflared
8). chmod +x /scripts/dns-change*
9). Lastly add these entries into your crontab.
crontab -e
0 0 * * * /scripts/dns-change1.sh
0 1 * * * /scripts/dns-change2.sh
0 2 * * * /scripts/dns-change3.sh
0 3 * * * /scripts/dns-change1.sh
0 4 * * * /scripts/dns-change2.sh
0 5 * * * /scripts/dns-change3.sh
0 6 * * * /scripts/dns-change1.sh
0 7 * * * /scripts/dns-change2.sh
0 8 * * * /scripts/dns-change3.sh
0 9 * * * /scripts/dns-change1.sh
0 10 * * * /scripts/dns-change2.sh
0 11 * * * /scripts/dns-change3.sh
0 12 * * * /scripts/dns-change1.sh
0 13 * * * /scripts/dns-change2.sh
0 14 * * * /scripts/dns-change3.sh
0 15 * * * /scripts/dns-change1.sh
0 16 * * * /scripts/dns-change2.sh
0 17 * * * /scripts/dns-change3.sh
0 18 * * * /scripts/dns-change1.sh
0 19 * * * /scripts/dns-change2.sh
0 20 * * * /scripts/dns-change3.sh
0 21 * * * /scripts/dns-change1.sh
0 22 * * * /scripts/dns-change2.sh
0 23 * * * /scripts/dns-change3.sh
Now your upstream DNS provider will change once every hour.